Beantextures Devlog 1 - The Troubling Experiment
Hullo! Welcome to the first post of the Beantextures development series. I have not written anything about Beantextures from the start, so this is gonna be a long read. Buckle up, ladies and gents.
Background

The Beantextures project (the first version) started back in December 2023, in an effort to contribute something to BeanwareHQ :) Also, Labirhin’s stylistic animations inspired me to write Beantextures.
So.. what exactly is Beantextures?
Well, in short, it’s a Blender add-on that allows you to easily make animatable 2D textures!
An example of a rig with 2D textures control
I target animators who want to make animatable textures for their characters (facial features, body marks, etc.), so I will just focus on that specific use case. There are lots of ways to animate facial expressions, and switching 2D textures is one of them. It’s very stylistic and saves you lots of time (you don’t have to create complicated rigs that modify 3D meshes), and I’m a big fan of it.
The Problem
Creating animatable 2D textures is actually already possible. There are many approaches to do exactly that. However, no one likes this material setup:
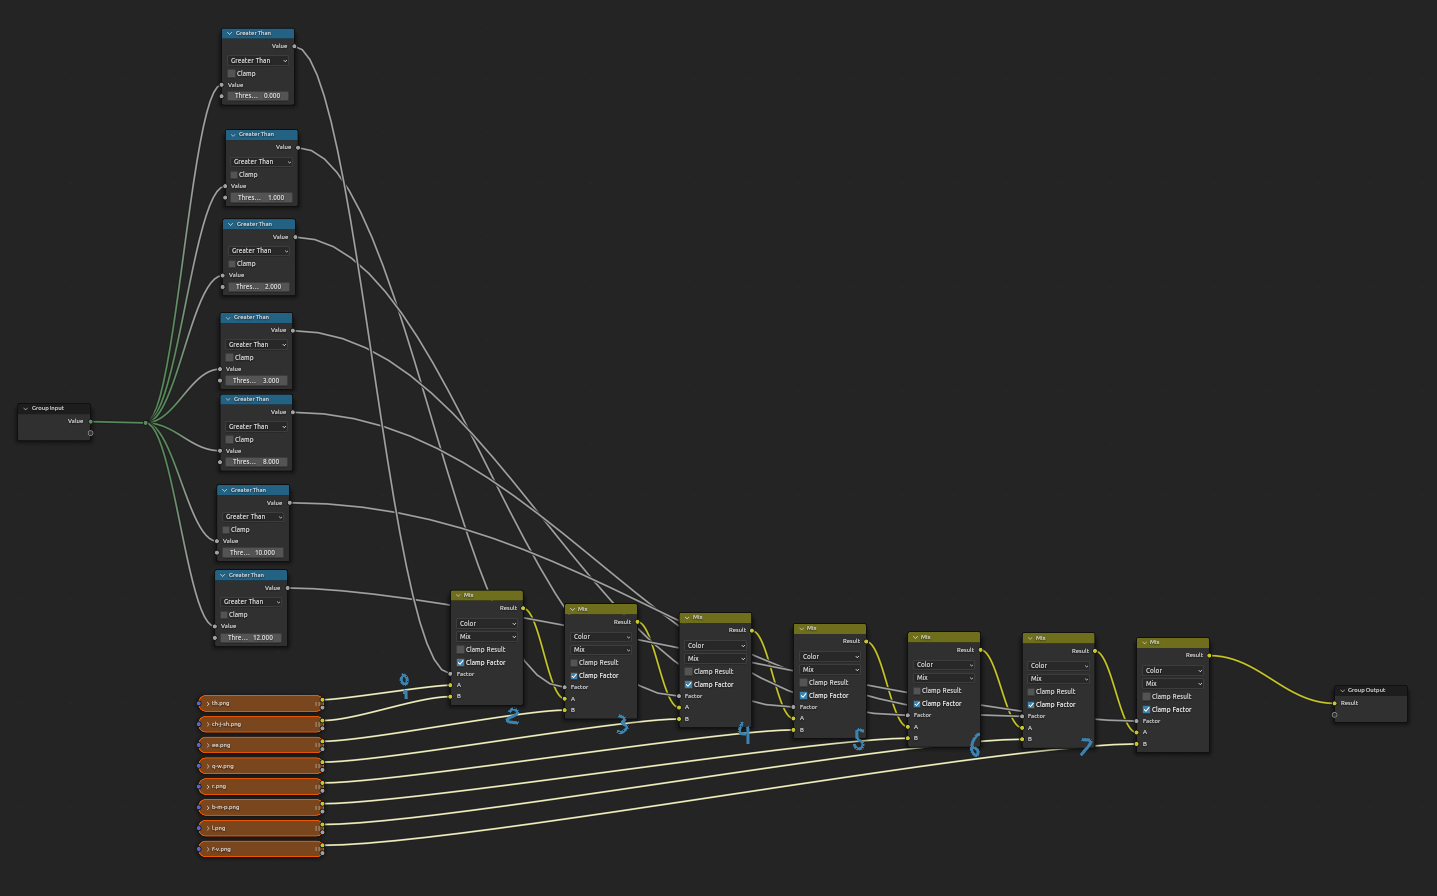
or.. well, there’s a better manual solution involving an image sequence node (which I had just found out to actually work today.. will tell further later on) —but even then, it’s only good enough for simple textures:
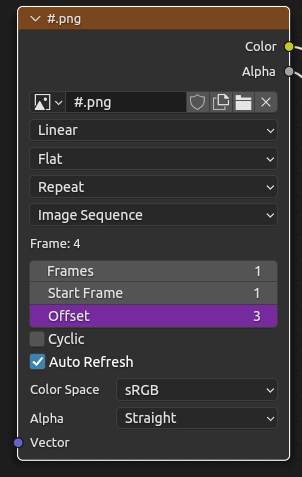
Point is, all of the current solutions are very FAR from being user-friendly! No one likes memorizing which number corresponds to which image, and most importantly, we all hate doing the repetitive tasks ourselves!
So yep, that’s why I decided to write Beantextures. I aim to make animatable textures only a few clicks away from ready, without you having to think too much of the maths and the messy logics behind it—all that while still being powerful and very capable through the use of Blender drivers (if you wish to add some).
The First Attempt
As mentioned before, I started writing Beantextures in December 2023. I didn’t have a good picture of Blender’s API back then though, so all I made was just an operator that toggles whether the active object is a Beantextures object or not. Yep, nothing much.
A Comeback
Then, in March 2024, I finished a simple UI prototype on a piece of paper and then wrote a working proof-of-concept. Let’s just call it Beantextures v.2.
Demo of Beantextures v.2
Beantextures v.2 provides some storage classes alongside operators which the user can invoke in order to manage the storage. To actually switch a texture, it hooks an update function to the frame change event. Here’s a cheap diagram to show the structure of my add-on:
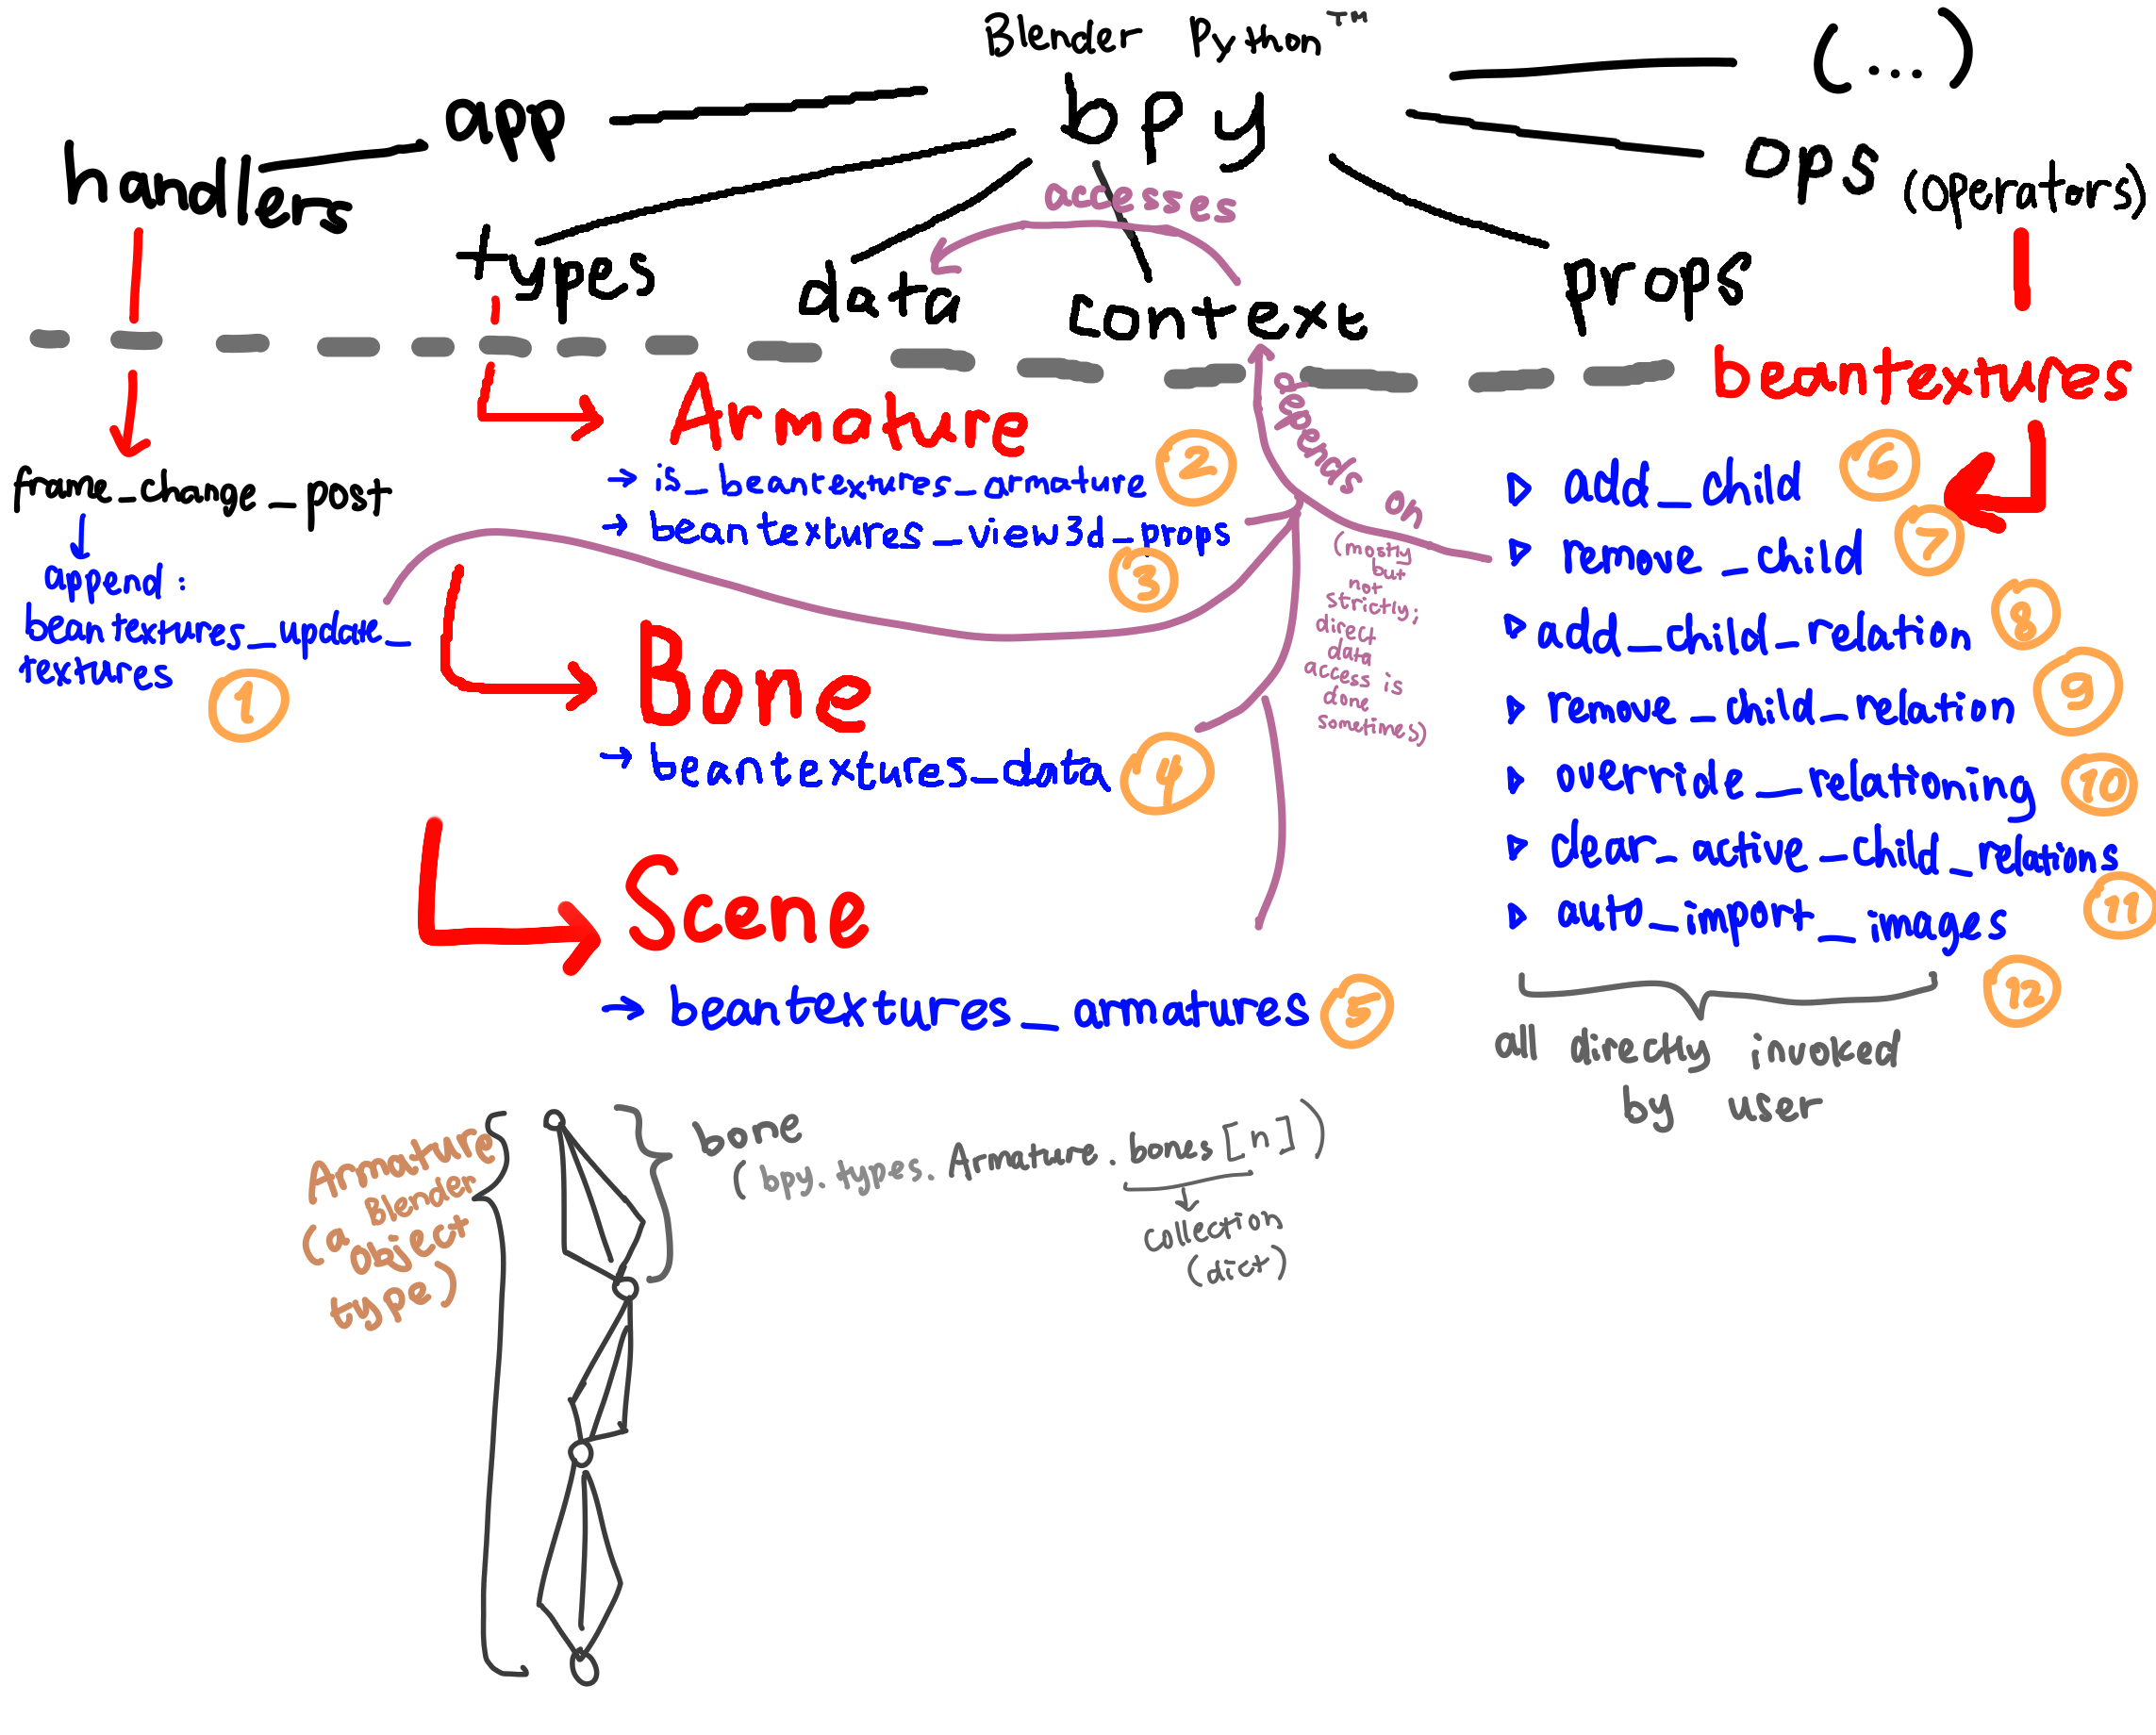
We’ll talk about EVERYTHING. It’s gonna be fun!
A Brief Introduction to Blender’s API
Maybe you’ve already known about Blender’s API, but I’ll just explain it for clarity. Blender’s core is written in C and C++, but most high-level components (UI components, operators, etc.) are written in Python. You can only write Blender add-ons using its Python API by exposing (registering) custom-made classes derived from the API’s base classes.
Here are some important modules from Blender’s API (bpy), explained in short:
-
Types (
bpy.types) → module providing types (Python base classes) for several in-app things, like 3D objects, armatures (rigs), armature bones, etc. -
Data (
bpy.data) → module used to access in-app data directly, i.e 3D objects, armatures, and whatever else exists on your Blender file. -
Context access (
bpy.context) → module used to access in-app data depending on the user’s selection (e.g active 3D object, active scene, etc.) -
Property definitions (
bpy.props) → module used to define custom Blender-compatible properties, likeintprops,strprops, etc. Yes, you can’t just dovariable: int, it’svariable: bpy.props.IntProperty(name="whatevername", description="some description, update=some_function). -
Operators (
bpy.ops) → module used to access operators, i.e functionalities that can be invoked by either a script or by the user (by pressing buttons, searching it up, or executed through the command line functionality). -
App data (
bpy.app) → module used to access application values that remain unchanged during runtime. -
Utilities (
bpy.utils) → collection of utilities specific to Blender but not associated with Blender’s internal data. This includes theregister_classfunction which registers your custom class(es) to Blender.
If you wanna learn more about it, I recommend reading the official Blender API quick start guide.
Beantextures v.2’s Basic Logic
Beantextures v.2 works by a very, very simple logic. Let me show you what I mean and construct this add-on together.
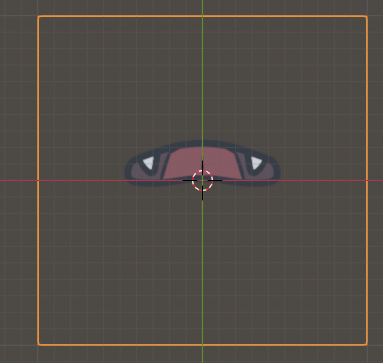
Here’s a normal 3D plane with a mouth (shaped “r”) image applied to it:
And here’s the node tree setup for that:
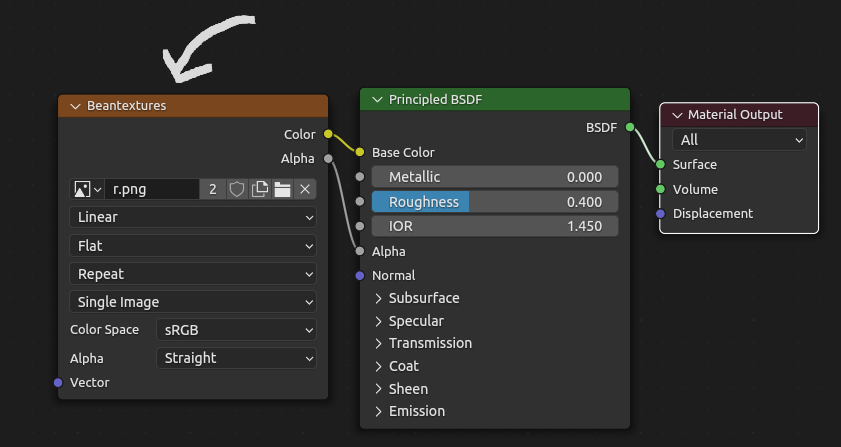
The image texture node (pointed with an arrow) is what gives the shader the colors and alpha/transparency, that’s why we plug the image texture’s color and alpha socket to the Principled BSDF Shader. Also, the Principled BSDF Shader is basically this really cool Blender’s implementation of Disney’s Principled Shader (literally) that can make virtually any real life-like material (in case you don’t know).
Now, there’s something special about that image texture node. If we try to access the node through Python:
import bpy
image_node = bpy.data.materials["Material"].node_tree.nodes["Beantextures"]
We get several attributes from image_node, including an image attribute.
That image attribute (image_node.image) is actually a reference to Blender’s image data-block. It’s a subclass of bpy.types.Image. The image attribute can also be written to. Therefore, we can just overwrite that attribute with whatever image data-block we want in order change the image selected. Easy-peasy, right?
image_node.image = bpy.data.images['q-w'] # note: subclass of bpy.types.Image
And after executing that, we finally changed the image texture!
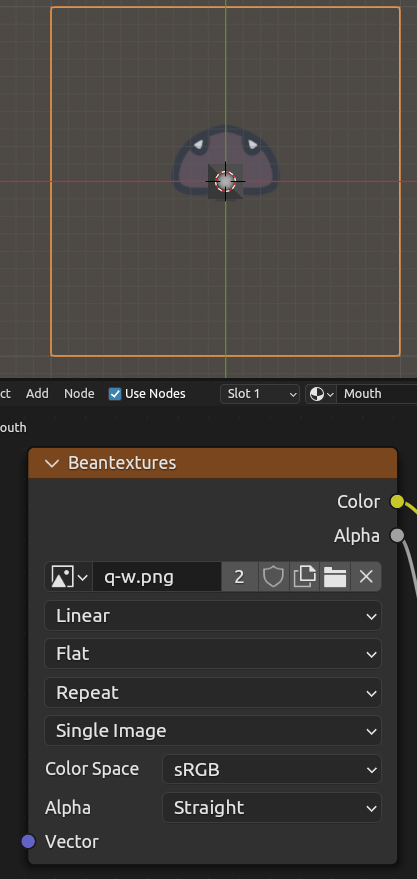
So, in theory, we can just make Beantextures an add-on that automates the change of the image used on an image texture node—based on some known information. Very cool and powerful, right?
But unfortunately, nope, sorry to break it. It’s not that straightforward. But we’ll get to that later, let’s work on how to get those “some known information” first!
Data Modelling
First, the fun part. Let’s solve the issue of having to memorize which number corresponds to which image when using the conventional methods. We will make “relations”!
A relation will point to an image. So now, we can just refer to that image using whatever name we want. Even if we don’t need meaningful names (i.e when we only need integer-named relations), it’s still nice to be able to put custom indices for each of the images.
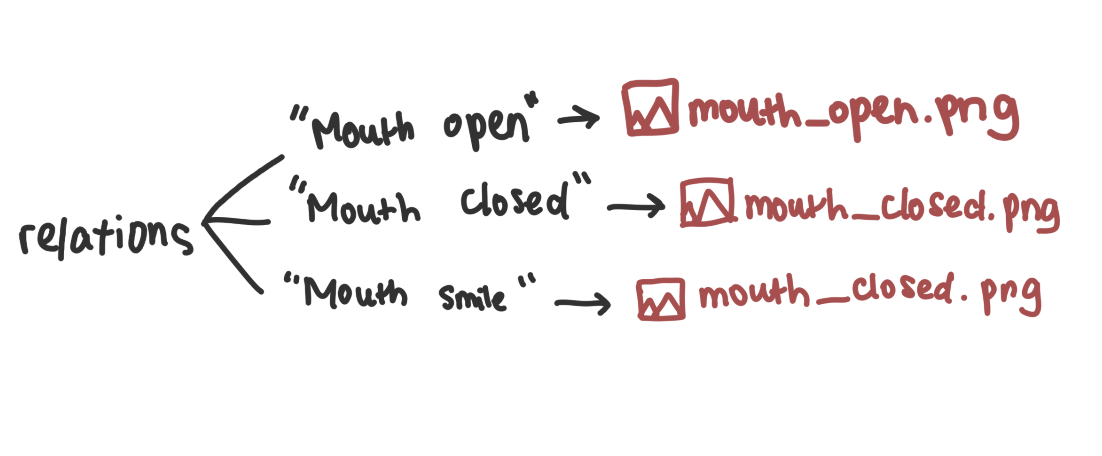
Now, since relations are just options of images you can apply on a single image texture node, we need some extra grouping. Let’s have something that stores a reference to the target node along with the relations (image options) necessary. We will call it a Beantextures child. Let’s make children an array of childs!

With this system, one entity can control more than one image texture nodes—but just one is also fine.
But what entity, exactly? Where should we store all those? An armature? But that would mean that all Beantextures children would be visible across bones. On a complex rig, this isn’t ideal, so let’s store it on individual bones instead. Each bone in an armature can have its own sets of relations.

Note: the real structure has more variables, but those are really the only ones you need to care about.
So our conclusion would be: with this system, one bone can control more than one image textures nodes.
Alright, great! Now we just need a friendly way to make those children and relations, then have a way to choose which image we’re using for one child.
User Interface
Managing Children and Relations
The only sensible place to put Beantextures configuration panel would be on the bone properties panel, obviously. All the necessary data we’ve modelled out so far are owned by a bone.
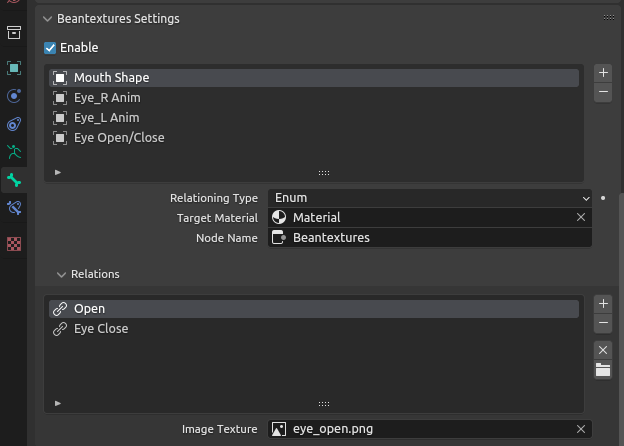
I’m not gonna cover up the details of every single UI components there because it’s not that important. Just know, those widgets expose necessary properties to the user and the rest call operators provided by Beantextures to manage Beantextures’ data for a bone.
With the panel above, you can configure Beantexture children of a bone along with its relations.
Okay, but there’s one thing I haven’t explained yet: relationing type for a child (seen from image above). For this to make sense, we need to talk about how we can actually reference the image we want first—and really find how to implement that.
How to Actually Reference an Image
On traditional approaches, the only way to switch an image on an image texture is by supplying a float/integer number referencing the respective image, since there is built-in enumeration feature you can use on shader nodes.
Let’s discuss one of the common ways to do it, which I have shown earlier. Here’s a simpler version it:
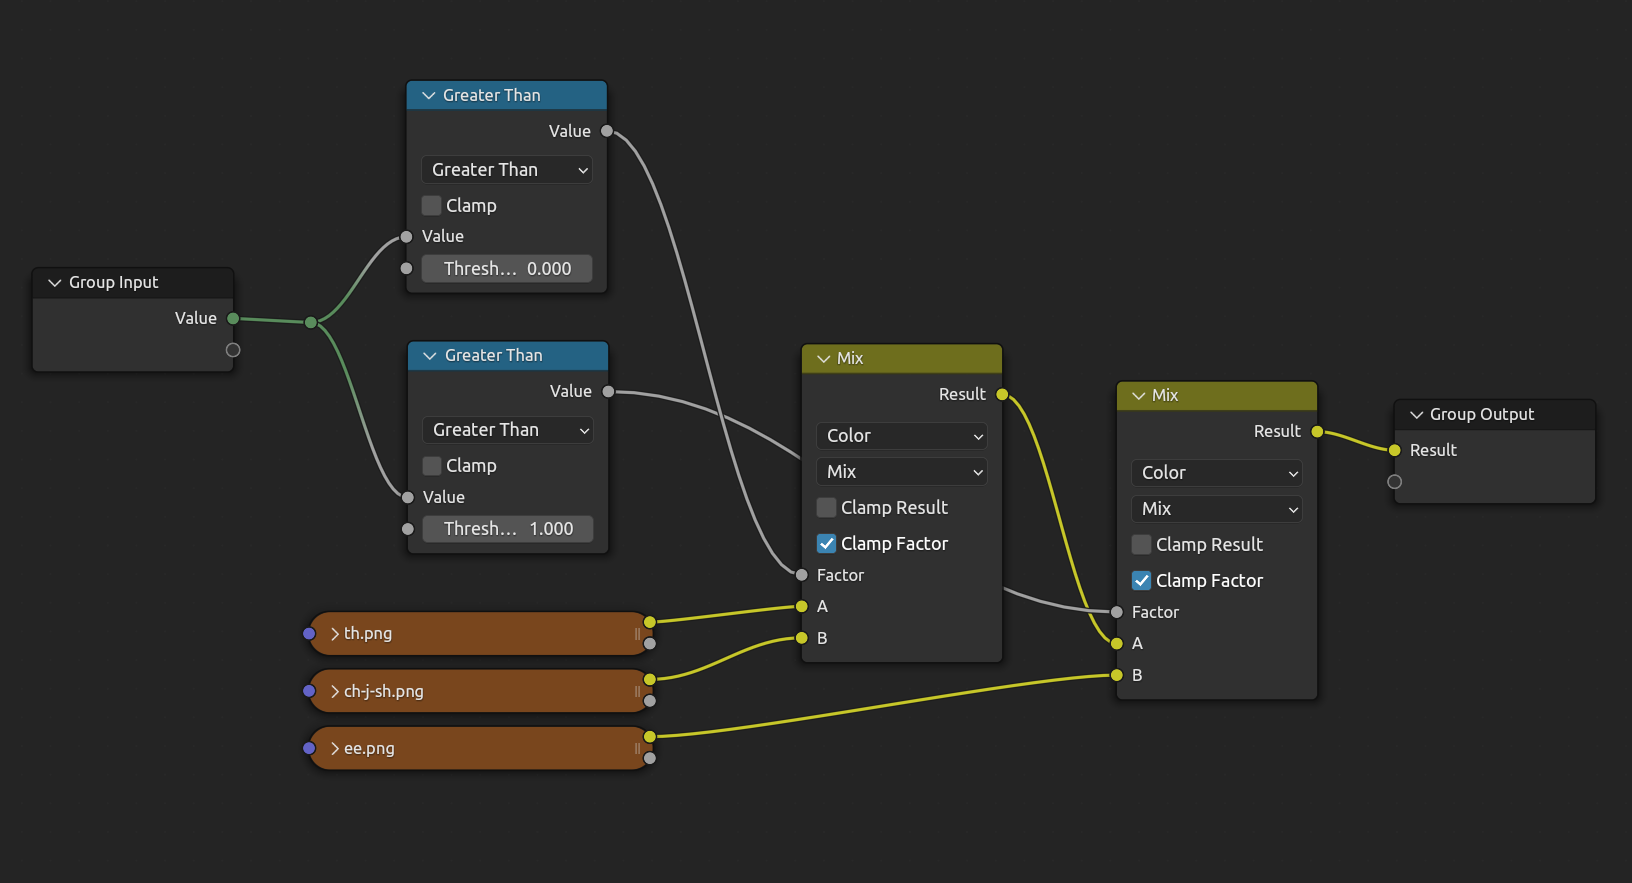
This setup works for 3 images, and the node tree will output an image based on a given float (the Value socket on the Group Input node). The Value would be whatever number we choose depending on which image we want. It then gets plugged into several Greater Than (math) nodes, where they will output either 0 (false) or 1 (true) based on certain thresholds we define. Since they are plugged in parallel, it is possible that there will be more than one Greater Than outputting true when the conditions are met. All of those Greater Thans then gets to override the Factor socket on the Mix nodes, which determines which image gets finalized into the Result socket on the Group Output node.
Don’t worry if it’s confusing, let’s just simplify it. All it does is this:
Changing image based on a given number
This is fine when you don’t really need to know the name of the image used (like on an animation, where each image is just a frame for that animation). But most of the time, it’s really better to be able to choose which image you want with a human-readable identifier (i.e enumeration).
Let’s try to implement relationing type, a.k.a options on how you can reference which image you want.
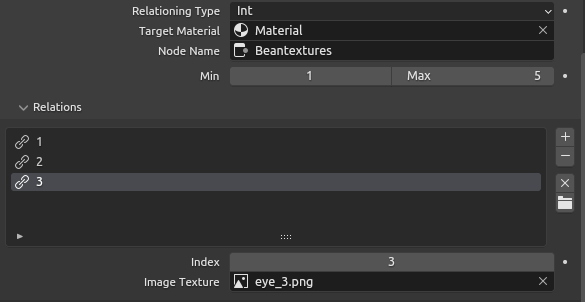
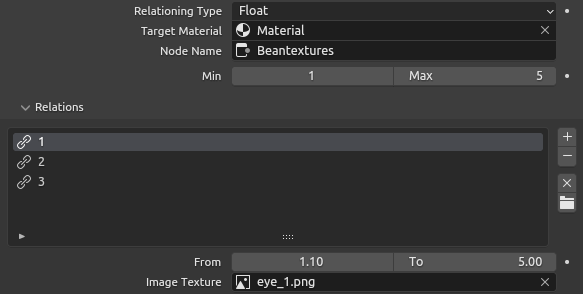
Beantextures v.2 has three relationing type options: enum, int, and float.
First, Enum relationing type. This allows you to directly reference a Beantextures relation’s name to get the image you want.
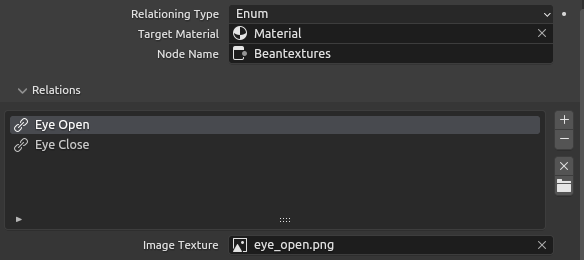
Second, Int relationing type. Simple enough, this allows you to reference an image by an integer.
Lastly, Float relationing type. Also pretty straightforward, this allows you to reference an image by a float.
We will store a relationing type for as an attribute for a Beantextures child (underlined red):

So there we go, now we just gotta code the real interface so we can choose whatever image we want for a target Image Texture node.
Picking Images in Action
By collecting informations we have from the Beantextures data attribute on a bone, we can simply build new widgets we can place somewhere. The view3d panel is a perfect choice, since it’s collapsible and is located directly in the 3D viewport:
Now, this wasn’t as easy as I thought. On my first attempt, I stored all of the user-changeable properties under each bone’s Beantexture child which seems like the most elegant solution (underlined red):

However, this ONE ANNOYING 8 YEAR-OLD BLENDER BUG causes the view3d properties (a custom Bone PropertyGroup, i.e beantextures_data) to not be animatable or drivable (by drivers) because Blender cannot dereference the paths for the properties. And that is enough to break Beantextures’s SOLE PURPOSE: to make textures ANIMATABLE!
Dammit, they’re probably not going to fix this any time soon. Let’s just place informations about the view3d properties somewhere else, like the armature:

So now, we have global view3d properties under an armature and they will store the index of our active bone’s child.
Yep, this approach means that we have 🎉 SUCCESSFULLY CLUTTERED OUR DATA STRUCTURE by using indices that can easily break! How fun, Blender. But since you’re a free and open source software, I’ll let that slide.
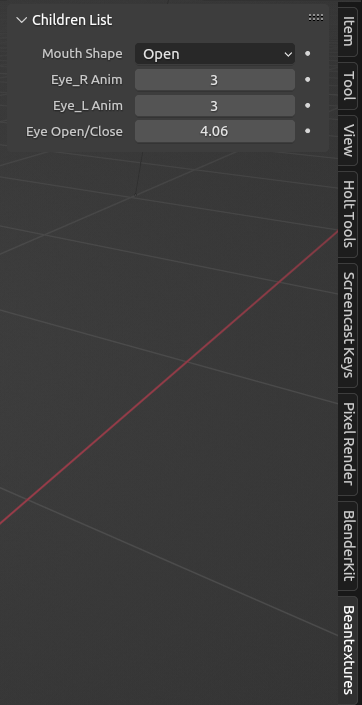
Okay, great! We now got a functioning panel that lets the user pick which image should be active for every children, by either an enum item, an integer, or a float:
The Real Image-Changing Business
Our last job! Maybe..? Okay, let’s do some backend shit.
Blender’s builtin properties allow you to pass an update parameter, which is a function that Blender will call whenever its value got updated. Here’s an example:
import bpy
def print_value(self, context):
    # By the way, self would be the active armature in this case.
    print("Current value is", self.custom_property) # Print out to console

# Declare a custom property under bpy.types.Armature
bpy.types.Armature.custom_property = bpy.props.IntProperty(name="A Cool Int", update=print_value)
So now, when we update that property, we will get something like this:
 note: C is a builtin shorthand to
 bpy.context
Okay, back to Beantextures v.2. Let’s make a simple callback that gets called when the user changes our property (with enum relationing in this case, just because the implementation is the easiest):
def enum_rel_update_target_image(self, context):
    ...

    try:
        target_image = relations[self.curr_enum_item].img

        # The real magic!
        bpy.data.materials[child.child_material.name].node_tree.nodes[child.node_name].image = target_image

    except KeyError:
        return

...

# Just a wrapper to modularize things
def update_enum(self, context):
    enum_rel_update_target_image(self, context)

...

class Beantextures_View3DPanelProps(bpy.types.PropertyGroup):
    ...
    curr_enum_item: bpy.props.EnumProperty(..., update=update_enum) # voilà!
So now, whenever the user changes that enum property from the view3d panel, our target Image Texture node’s image gets changed!
Our callback is called when the user changes the enum property!
Sweet. We’re done now, right??
Well, fuck no—that’s too good to be true. Let’s just say that Blender’s documentation for built-in properties forgot to mention a very, very crucial thing: the callback is only called when the property value is changed by the user or by a script, but NOT by animation keyframes/drivers!
This means that even though our properties can be animated, the image will only be changed when the user manually changes the property’s value. Or in other words, our add-on failed to deliver its very promise.
Property changes, but not the image?!?!
Handlers to the Rescue
At this point, I nearly sobbed. I mean, how else can I make this work!? I should’ve done more research before I started writing this.. 💀
But fear no more, as app handlers exist to save our day with our superhero: frame_change_post!
Now, the logic is, you loop through every single 3D object on the scene, and just manually call our previous image-changing callback if the object is indeed a Beantextures-enabled armature.
# Handler
@persistent
def beantextures_update_textures(scene):
    for obj in scene.objects:
        if obj.type != 'ARMATURE':
            continue

        if not obj.data.is_beantextures_armature:
            return

        view3d_props = obj.data.beantextures_view3d_props
        for bone in obj.data.bones:
            data = bone.beantextures_data
            for child in data.children:
                match child.relationing_type:
                    case 'INT':
                        int_rel_update_target_image(view3d_props[child.view3d_props_idx], bpy.context)
                    case 'FLOAT':
                        float_rel_update_target_image(view3d_props[child.view3d_props_idx], bpy.context)
                    case 'ENUM':
                        enum_rel_update_target_image(view3d_props[child.view3d_props_idx], bpy.context)

...

# Register the handler
bpy.app.handlers.frame_change_post.append(beantextures_update_textures)
Yes, we can indeed just make a list of Beantextures armatures and loop through that instead, but oh boy, I just want to see this working first.
Easy. Now check out our add-on:
Property changes AND the image got updated!
So, What’s the Catch?
“Okay but why third rewrite?,” You may ask.
Well first of all, this add-on adds some extra 2-5% CPU usage (on my machine; with only one bone)! THAT’S NOT GOOD. AT ALL. Traditional ways of doing animatable textures that directly use shader nodes work more efficiently and doesn’t add too much load. Imagine all the system loads of animating a super complex rig with 15 Beantextures relations. Ugh, yuck. I hate inefficiency.
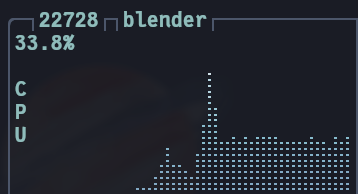
Animation playing with Beantextures (1 bone)
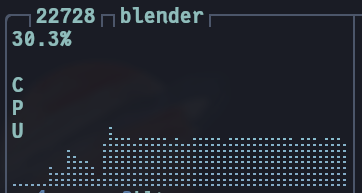
Animation playing with built-in shader nodes (1 bone)
Second, Blender’s API changes faster than the speed of light. If I die one day and no one wants to continue this project (..means no one uses this? Which would then be fine but anyways,), this add-on would be as pointless as hitting ctrl + s 25 times after finishing your Blender project. Why? Because this add-on has its own logics for everything. It doesn’t generate a rig system (example is Rigify), but rather, it adds another layer of complexity.
I can do better. I CAN DO BETTER:
A Better Solution
Lesson learned. Just use what’s available, don’t invent things that already exist. My goal for the third rewrite of Beantextures would be making it a rig-generating add-on that utilizes Blender’s shader nodes directly, without the need for it to provide its own logics.
And also yeah, I didn’t know that the Image Sequence node can indeed be used to make animatable textures, I forgot to set the Frames parameter to 1 :D I’m definitely gonna try to utilize that on my third rewrite.
Thank you for reading, have a nice day.
